
|
U. S. CIVIL WAR
PHOTOGRAPHS
|

|
SHARPSBURG (ANTIETAM)
(PAGE 5 OF 13)
| |
THE BATTLE
(Continued)
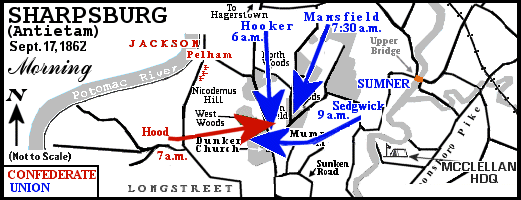
Morning Action.
 The first phase of attacks came in the early morning. General Hooker sent 10
Brigades from the North Woods against Stonewall Jackson. In the bloody cornfield,
Jackson's forces, being supported by brigades transferred from the sunken road
and futher south (and an attack led by Confederate General Hood), fought the
Federals to a standstill. The attacks and counterattacks across the cornfield
cut the stalks, as Hooker later wrote, "...as closely as could have been done
with a knife..."
The first phase of attacks came in the early morning. General Hooker sent 10
Brigades from the North Woods against Stonewall Jackson. In the bloody cornfield,
Jackson's forces, being supported by brigades transferred from the sunken road
and futher south (and an attack led by Confederate General Hood), fought the
Federals to a standstill. The attacks and counterattacks across the cornfield
cut the stalks, as Hooker later wrote, "...as closely as could have been done
with a knife..."
About an hour and a half after Hooker's attack began, Union General Mansfield's
XII Corps arrived on the battlefield from the north. They had camped more than a
mile behind Hooker and began marching when they heard Hooker's opening shots.
Almost immediately, Mansfield was mortally wounded and Brig. Gen. Alpheus
Williams took command. The newly arrived Union force fought the Confederates in
the West Woods and around the Dunker Church, and although they came close, they
were unable to break the Confederate lines.
The third major Federal attack of the morning came when Maj. Gen. John Sedgwick's
division led by Maj. Gen. Edwin V. Sumner (II Corps Commander), crossed Antietam
Creek at Pry's Mill Ford (not shown on the map above). Brig. Gen William French's
division followed, but drifted south and soon lost contact with Sedgwick's men.
Believing that French's division was following, Sumner led Sedgwick's division
across the Mumma farm and into the West Woods. There, they walked into an ambush
set by Stonewall Jackson, who had obtained re-enforcements from the southern part
of the battlefield and from McLaws forces, just arriving from Harpers Ferry.
Nearly half of Sedgwick's 5,000 men were struck down in less than twenty minutes.
Those that got away found cover under the fire of Segwick's artillery in the
cornfield.
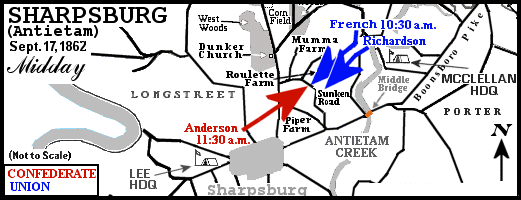
Midday Action.
Brig. Gen. William French's division lost contact with Sedgwick's division and
veered south toward the Roulette farm house, possibly drawn by the shots of enemy
skirmishers. As they advanced they encountered Gen. D.H. Hill's Confederate
infantry brigades in the farm house and along the Sunken Road, which is part of a
road that connects Hagerstown Pike to Boonesboro Pike. The Confederates poured
heavy fire into the Federals and they fell back. For three hours, French's troops
charged and then fell back. It was then that Union Maj.Gen. Israel Richardson's
division arrived to the left of French's troops and also attacked the Rebels at
the sunken road. As the battle raged, Confederate Maj. Gen. R. H. Anderson's
five brigades arrived behind the Confederates at the Sunken Road. Almost
immediately Anderson was wounded and the Confederate drive stalled.
At this time, due to a confusion with orders, Brig. Gen. Robert Rodes's men, of
D.H. Hill's division, withdrew from the sunken road to the rear. This left a gap
in the Confederate line which allowed Union Colonel Francis Barlow to move two
regiments across the sunken road. Firing down the road, the Union soldiers raked
the Confederates with numerous volleys, killing many. The surviving Confederates
retreated toward the town. This resulted in the Sunken Road becoming known as the
Bloody Lane. But the Federals had suffered also. In this battle Union Colonel
Barlow was seriously wounded and Maj. Gen. Richardson was mortally wounded.
 There was now a large gap in the Confederate lines made by the Union victory at
the Sunken Road. Had they attacked through this gap, the Union forces would have
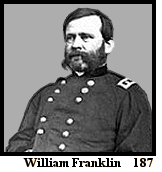
encountered hardly any resistance. Union General Franklin's VI Corps was massed
for such an attack, but General McClellan restrained them. McClellan felt that an
attack would not be prudent due to the army's extended position on the right.
There was now a large gap in the Confederate lines made by the Union victory at
the Sunken Road. Had they attacked through this gap, the Union forces would have
encountered hardly any resistance. Union General Franklin's VI Corps was massed
for such an attack, but General McClellan restrained them. McClellan felt that an
attack would not be prudent due to the army's extended position on the right.
|
|
PAGE SIX
 >
Civil War Photos
>
Sharpsburg
>
Page 2
>
3
>
4
>
5
>
6
>
7
>
8
>
9
>
10
>
11
>
12
>
13
>
Civil War Photos
>
Sharpsburg
>
Page 2
>
3
>
4
>
5
>
6
>
7
>
8
>
9
>
10
>
11
>
12
>
13
Notes
|
|